If you are receiving a good amount of traffic on your website, you might want to consider turning those website visitors into your email subscribers. We have already mentioned why building an email list is important in the past. However, we have just got an awesome idea for increasing your email signups!
In this article, we are going to show you how can you increase your email signups by enabling the content locking features through the OptinMonster WordPress plugin!
OptinMonster
If you are in the WordPress and blogging field for a while, you probably know about the OptinMonster WordPress plugin. OptinMonster is one of the best solutions used for increasing sales and generating leads. The plugin is created by the Awesome Motive team, who also developed cutting edge solutions like WPForms, MonsterInsights, SeedProd, etc.
You can find so many WordPress lead generation plugins in the market. But, we always recommend OptinMonster for our website visitors.
The unique features of the OptinMonster WordPress plugin are:
- MonsterLinks.
- Exit-Intent.
- Yes/ No Forms.
- Inline Forms.
- Countdown Timer.
- Coupon Wheel Optin.
- Floating Bar.
- Sidebar Forms.
Etc.
Now, let’s take a look at OptinMonster’s pricing.
OptinMonster Pricing
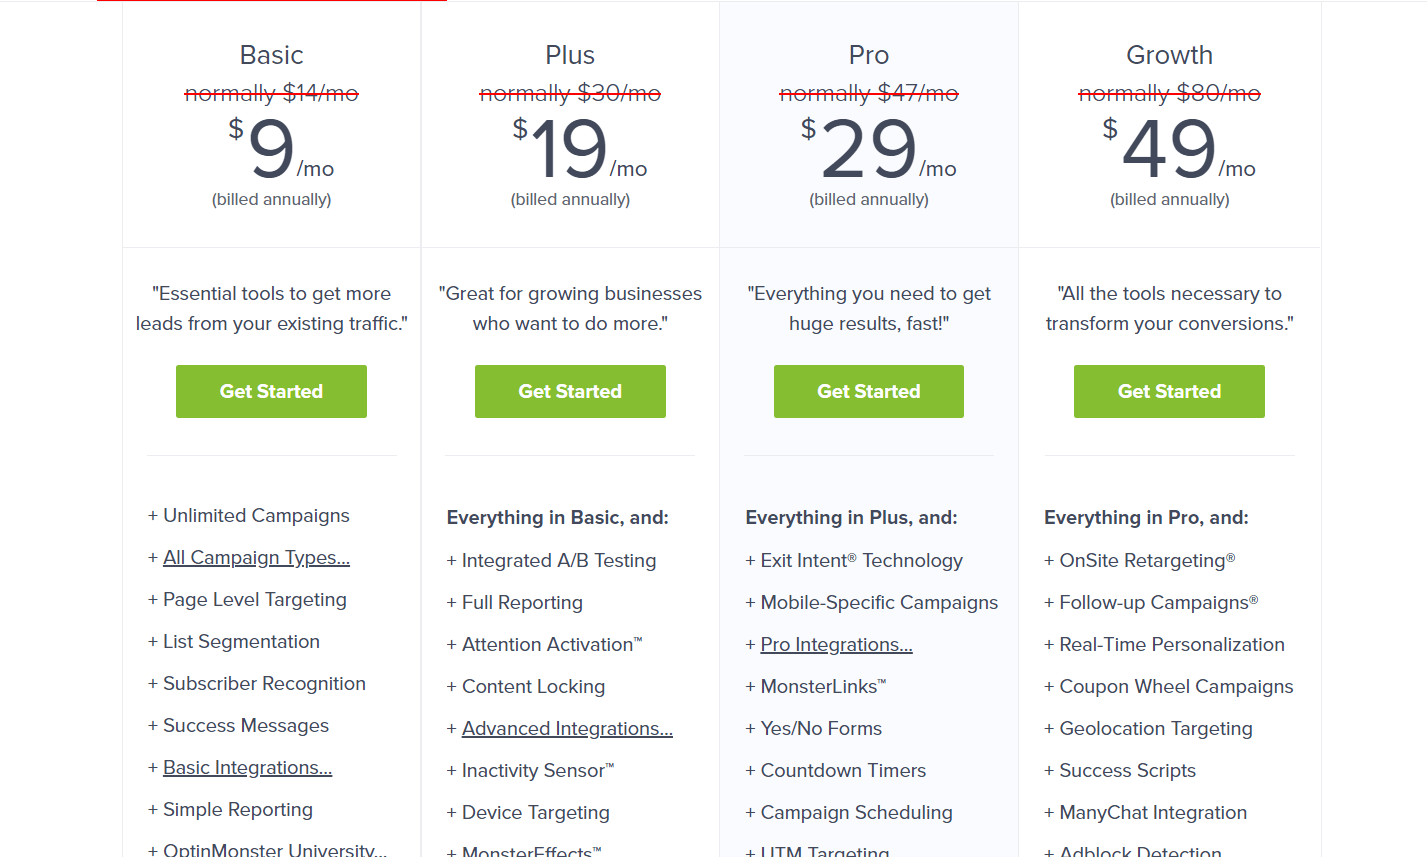
As of today, there is no free version available. There are four premium plans available.
- Basic – $9/ month.
- Plus – $19/ month.
- Pro – $29/ month.
- Growth – $49/ month.
For using the Content Locking feature, you might want to consider purchasing the Plus or any higher plan.
How To Enable Content Locking Using OptinMonster?
The very first thing you need to do is, get the OptinMonster premium. As I mentioned earlier, you can purchase the Plus/ Pro/ Growth plan for using the Content Locking feature. So, go to OptinMonster.
Using your PayPal account or Credit Card, purchase the premium plan. Once you have done that, you will be able to log in to your OptinMonster account, create new campaigns, access the licensing information, etc.
Just like we create a normal campaign, create one. You can choose any template from the pre-made templates section. We highly recommend choosing the Inline Campaign type.
Right after you choose the template, you will be redirected to the campaign builder.
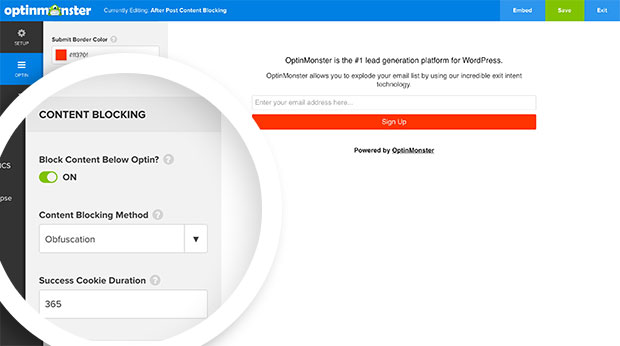
Design and edit your OptinMonster campaign from there. Under the Optin tab, you will see an option called Content Blocking.
Turn that ON.
You got two methods there.
- Obfuscation.
- Removal.
By default, the Obfuscation method will be selected. When you choose this, the text below optin becomes blurred. The visitors won’t be able to read it but can understand the text, heading tags, and images. If you choose the removal option, all the text below your optin will be removed.
So this is how you can enable content locking through the OptinMonster app.
The very next thing you need to di is, embed the inline form inside our content. If we need to add this form in every post after a specific paragraph, we recommend using an ad management plugin.
OptinMonster can be integrated with almost every email service provider. So no matter which email marketing service you are using. The campaign can be integrated with any of them.
Get Started With OptinMonster
You can get the premium version of OptinMonster from below.
We hope you have found this article helpful and enjoyed the read. If you did, please consider sharing this post with your friends and fellow bloggers on social media. You can check out our blog section for more related articles.


Leave a Reply